Summary
This guide will walk you through the process of creating a CoursePro membership type.
What is CoursePro?
CoursePro is software designed to manage lessons and courses for clients. Although it can be used as a standalone product, integrating it with Flow creates a more seamless experience.
With this integration:
- Flow handles pricing and processes recurring payments.
- Flow acts as the primary source for user details and membership status, which it updates in CoursePro.
Courses and Memberships in CoursePro
Flow manages the pricing and payment options for courses in CoursePro. There are three types of memberships you can create:
- Recurring Membership: Monthly payments for ongoing courses.
- Fixed-Term Membership: A fixed-duration course (e.g., a 3-month weekly course).
- Session Purchase: One-off purchases (e.g., for individual sessions or top-ups).
Step-by-step guide
1. Access the Membership Module
- From the homepage, select the Membership module.
- Navigate to the Membership Type tab.
2. Create a New Membership
- Scroll to the bottom of the page and click the Create New Membership button.
3. Fill in the Membership Details
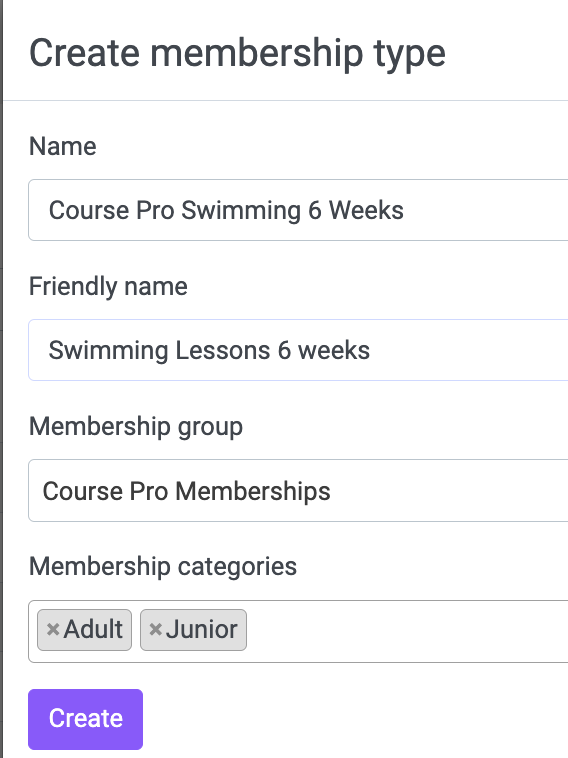
- Name: Enter the name of the membership.
- Friendly Name: This is the name customers will see on the booking system.
- Membership Group: Select the appropriate membership group (e.g., CoursePro).
- Membership Category: Choose the relevant category.
4. Configure Advanced Settings
Once created, click on 'Manage Settings'.
Important:
After creating the membership, go to the Advanced tab first to enable CoursePro integration.
If you save the details in the General tab before enabling integration, it defaults to "None" and cannot be changed later. You will need to start over if this happens.
-
In the Advanced tab, configure the following options:
-
Membership Benefits: List any additional perks (e.g., free bottled water).
-
Eligibility Criteria: Specify who is eligible (e.g., a student membership requires a student ID).
- Mark as Counted Sale: If you want the membership purchase to be counted as a sale, enable this option.
- Freeze Option: Decide if customers can freeze their membership for a period. Learn more in the Applying a Membership Freeze section.
-
Purchase Channels: Choose if the membership can be purchased online, front-of-house, both or not at all.
-
Allow Membership Renewal: Decide if customers can renew their membership Online, front-of-house, both or not at all.
-
Membership Coverage: Select the centers covered by this membership.
-
Requires Staff Permission: Decide if you want to restrict this membership to be sold only by certain members of staff.
-
Allow Membership Changes: Enable this option if you want customers to upgrade or downgrade their membership.
-
Integration: Select CoursePro as the integration (do not leave this as "None").
-
Membership Benefits: List any additional perks (e.g., free bottled water).
-
If applicable, select a Concessionary Type (e.g., for students or seniors).
-
Click Update to save your settings.
5. General Tab Setup
- Return to the General tab to finalize the membership.
- The Name, Friendly Name, and Membership Group fields should already be populated.
- Complete any remaining fields:
- Active From/To: Set the date range during which the membership can be purchased.
- Description: Add a brief description of the membership's benefits or features.
6. Add Payment Options
- Navigate to the Payment Option tab to define the membership pricing.
Note:
You can only add one payment option per CoursePro membership. If you need both a recurring and a fixed payment option for the same course, you must create two separate memberships in Flow.
-
Click Create New Payment Option and choose between:
-
Fixed Payment: A one-time payment.
-
Recurring Payment: Monthly or yearly payments.
-
Fixed Payment: A one-time payment.
-
Select the CoursePro Membership Pricing Option and the Joining Fee Pricing Option (if applicable). If these pricing options haven’t been created yet, refer to the guide on Creating a CoursePro Membership Pricing Option.
-
Choose whether to publish the price for customers:
- Set this option to Yes if you're ready for customers to see and book the membership.
- You can unpublish the membership at any time by toggling this option to No.
-
Click Save to confirm your pricing details.
7. Publish Your Membership
- Once all settings and pricing are finalized, publish your membership to make it available for customers.